You say potato, I say ... plant now!
Tuesday 31 August 2010, 10:27AM
By Awapuni Nurseries
338 views


Po-tay-to, po-tahh-to – however you say it, now’s the time to plant one of New Zealand’s favourite veges. So get outdoors and gear up for spuds this summer.
You can start by purchasing seed potatoes from your local garden centre. Seed potatoes look like any other spud (but smaller!) and can be bought in various flavours and quantities.
The type of potato you choose to plant will depend on its taste and what you want to do with it. Some spuds make better chips; others come alive when roasted, while newer varieties are more resistant to diseases. If you’re looking for a general purpose potato try desiree, rua or karaka varieties – these spuds are suitable for most uses.
Once purchased, remove your seed potatoes from the bag or container and leave them in a dark, dry place to sprout for a few weeks. A garage bench or pantry cupboard is ideal.
When the potato shoots are approximately 2 cm long they’re ready to plant.
Before doing so, add some compost to the soil and mix well. A well composted garden will give you better results come harvest time.
Dig a shallow trench in your garden and place the potatoes inside - approximately three feet apart. Mound the soil up around and on top of the potatoes. New spuds hate Jack Frost, so cover them entirely to protect them from cold weather.
Once a month mound the soil around the potato plant. Ensure 5 cm of the plant’s stem is left sticking out the top. You don’t want any light to reach your spuds as this can affect how many potatoes your plant will produce. The more roots coming off your plant, the more spuds you will enjoy come Christmas. Last year I got 48 odd spuds off six seed potatoes – not a bad effort.
To keep diseases away don’t overhead water your potatoes excessively. Once planted the rain should be enough to keep them going until they’re ready for harvesting.
Some gardeners believe you should harvest your potatoes when the flowers on your potato plant begin to die off. However, some new spud varieties don’t produce flowers so this method can be a little tricky.
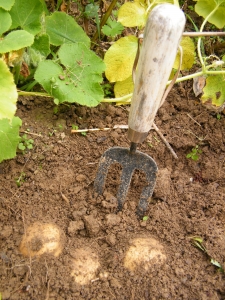
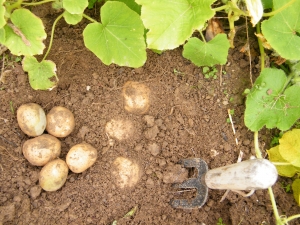
The best way to tell if your spuds are ready to leave the nest and enter your belly is to dig a few up to check. Sounds simple enough! Well it is.
Get out your spade and loosen the dirt around a few of your potato plants, put your hand in the soil and gently pull out a spud ensuring you don’t break the shoot connecting it to the plant. If your potatoes are green, cover with dirt and leave to mature further.
Once you’ve harvested your spuds dig the plant back in to the ground. Potato plants produce nitrogen and digging them in increases your soil’s nitrogen levels which is the most important element for good plant production and growth.
Potatoes are one of New Zealand’s favourite veges, so why not make a dish that celebrates the spud with cheesy scalloped potatoes.
First off, you want to make the creamy cheese sauce. Start by melting 2 tbsp of butter. Stir in 2 tbsp of flour and add salt and pepper. Once the butter is melted, stir in 1 ¼ cups of milk. Continue to stir until the mixture thickens. Add ¾ cups of cheese (e.g. Edam, Colby, Tasty), stir until melted and remove from heat.
Preheat the oven to 180 degrees. Cut four medium sized spuds into slices and place on the base of a greased oven-proof dish. Pour quarter of your creamy cheesy sauce over the sliced potatoes. Repeat layers until you’re out of sliced potatoes and sauce. Cover the top with ½ cup of grated cheese, cover and bake for 40 minutes or under the potatoes are cooked right through.
Let stand for five minutes, serve and enjoy!
Tod Palenski